A few tips for staining and sealing your deck.
Adding a wood deck to your property comes with many benefits, from extra living space to improved outdoor aesthetics. Deck improvements are also known to be one of the most profitable home renovation projects as they can generate returns based on the size and quality of materials you use. However, decks are susceptible to wear and tear from external conditions like any other architectural surface. Rain, UV rays, and water can all take a toll on your deck’s finish, so without realizing it, your stain or sealant may already be wearing off. You need to reapply a new coat to protect your deck and prevent damage when this happens. Staining and sealing a deck can be tedious, but it will be worth the time and effort.
To help you keep your deck in its best condition and preserve its beauty, here are ten tips for deck staining and sealing. Make sure you prepare thoroughly before using any product to prevent mistakes down the line.
Conduct a Water Test
If you have a brand-new deck, you recently built, you typically need to wait around 30 days before staining or sealing it. To check if your deck is ready, you can conduct the water test by taking some water and pouring it on your deck.
If the wood absorbs the water within 30 seconds, this should be a go signal to proceed with deck staining and sealing. However, if the water pools around the surface even after 30 seconds, you still need to wait. As much as possible, it would be best to stain or seal your deck as soon as it is ready since you want to avoid exposing it to harsh conditions.
Check the Weather Forecast
If you need to reapply your deck stain, make sure to look up the weather forecast first. Too much humidity will make it hard for the stain to stick well to your deck, but too much sunlight will cause the stain to dry faster than the wood can absorb it. The optimal temperature for deck staining and sealing would be between 50°F and 90°F when the weather is moderate.
Prepare the Surface
Preparation is key to a successful staining or sealing project. Start by cleaning the wood with a deck cleaner or pressure washer. You want to make sure to get rid of all oil, dirt, and debris since this can prevent the stain from sticking. Then, wait for the deck to dry completely before sanding the surface to smooth out rough edges.
Choose the Right Stain
If your deck already has an existing stain, you should consider this when deciding what to use for your project. For instance, a semi-transparent or transparent stain will not hold up well on a deck with a solid stain. However, you can use solid stains over any other stain since they have the most excellent color depth and can quickly soak into the wood.
Cover Plants and Outdoor Furniture
A deck staining and sealing project can get messy, so you should cover up your plants and outdoor furniture. First, water your plants slightly, then place a plastic sheet to prevent the chemicals from the stain from touching them. Likewise, bring in your furniture or cover it up with plastic to avoid getting stained.
Wear Old Clothes
As mentioned in the previous tip, staining and sealing your deck is not the cleanest home project to do. You should wear old clothes that you do not mind getting dirty. No matter how organized you are, it can be hard to avoid staining your clothes.
Test the Stain
If this is your first time staining your deck, start by testing the area to see if you like the color. It will be hard to change your mind if you jump right into a complete application. Also, like paint, a wood stain may not always look the same on the package. Thus, the best way to verify color accuracy is to test the stain on a small part of your deck.
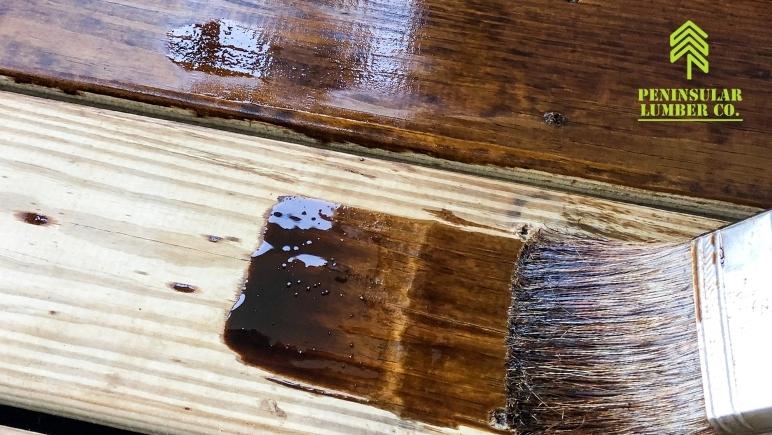
Use Thin Coats
When applying wood stain or sealer to your deck, always use thin coats to ensure that the product soaks into the wood and prevents puddles. The idea is to build it up slowly instead of doing it all in one go. If you use a transparent stain, you should make your coats even thinner than usual since doing otherwise can cause the stain to drip. Ideally, you should put two coats of stain on to protect your deck.
Start with Vertical Surfaces
Start by staining all vertical surfaces like railings, to have a smooth flow. Essentially, start with any area you can paint upright and while standing. If you start with the flooring, for example, you will probably end up stepping on the freshly painted floor when doing the other areas.
Keep Children Away
As much as you want to involve your children in this project, keeping the little ones away would be best. They may have too much fun watching you and potentially touch parts of the deck while they are still drying. Likewise, they might run over things in your work area and cause stains or sealers to spill, so you can do your project while they are at school.
Use High-Quality Lumber for Your Wood Decking
While deck staining and sealing can prolong the lifespan of your deck, high-quality lumber is another critical aspect of ensuring the structure’s durability. At Peninsular Lumber, we offer a range of wood that you can use to build your deck. If you are not sure what to use, call our lumber company in Tampa today at 813-875-8805 to get suggestions for your project.


Your article helped me a lot, is there any more related content? Thanks!