Are you searching for easy steps on how to build a wooden deck that offers a great outdoor space for relaxing, entertaining, and spending time with family and friends? Building a wooden deck with lumber is a popular option for homeowners in Tampa because it’s customizable, durable, budget-friendly, and likely to be utilized year-round. In this step-by-step guide, you will find easy-to-follow instructions on how to build a wooden deck with lumber.
How To Build a Wooden Deck the Right Way
Before you embark on your deck framing project, it is advisable to read this guide. While building a deck is an outstanding home improvement project, poorly constructed decks can show signs of wear and tear within a decade. Remember that a do-it-yourself home project should last over two decades without requiring significant repairs or replacements.
If you are trying to save time and reduce costs, your decks might have a short lifespan. So, if you want to build a deck on your house, it would help if you made a durable one, even if it would cost above and beyond what some homeowners consider excessive spending.
Here is how to build a wooden deck that looks great and stands the test of time:
You Might Need
This list contains the tools and building materials you need. To prepare the site, you need the following:
- Tape measure
- Edger
- Club hammer
- Builder’s line or string and pins
- Spirit level
- Spade
- Brick trowel
- Quick-drying concrete
- Gravel
- Damp-proof course
- Weed control fabric and pegs
Cut a deck board and lay sub-frame, you need:
- Coach screws
- Decking joists
- Combi drill
- Coach bolts
- Panel saw
- Socket set
- Circular saw
- Workbench
- Combination square
To lay lumber deck boards and solid composite deck boards, you need the following:
- Timber decking boards
- Twist and flat wood drill bits
- Decking screws
- Start clips and fasteners
- Decking screws
You also need a protective kit with protective gloves, safety goggles, rigger gloves, ear plugs, dust mask, decorator gloves, and knee pads.
How To Prepare the Deck
Before you begin the project, check with the local building authority to determine if you need any permits. Remember that building code is different, so it helps to inquire before starting.
Step 1: Surface the Ground
After familiarizing yourself with the legal requirements of building a deck, evaluating the surface on which you plan to place the deck is crucial, as it determines the required building materials. Whether you are building on grass, concrete, or soil, it is wise to consult site plans for any pipes that might be present before you start digging. In the event you don’t have site plans, it is advisable to contact the local council to avoid accidentally damaging pipes during the construction process.
Step 2: Determine the Height
After sorting out the position, it is time to assess the deck’s ideal level. Consider whether the deck will be attached to the house. If so, you must determine if you want to include a step.
Step 3: Determine the Timber and Lumber to Use
Decks are available in various styles and durability. If you live in Tampa coastal areas, you may need to use pressure-treated wood to design a lumber yard, as it fares well in coastal conditions. In addition to being affordable, pressure-treated lumber is easily accessible and insect-resistant. Next, you should determine the deck’s layout. Should it go perpendicular to the house, parallel, or a mixture of both?
You might opt for composite decking if you prefer another deck material. This material needs no coating or staining, as it is designed from recycled and new plastic and wood fibers. However, it needs to span better, meaning you must reduce the joist spacing.
How to Set Out a Wooden Deck
Step 1: Mark Out the Deck Area
Use marking paint to mark out the decking area so that you know where to place the hurdles. Hammer hurdles into every corner of the decking area and screw timber onto them. Else, you can use batter boards to establish the location and elevations of your foundation.
Step 2: Run the String Line
Create your deck’s shape with a string, ensuring you are content with the dimensions. Check if the deck measurements are well-positioned after placing the string.
How to Lay Stumps
Step 1: Measure and Mark the Stumps’ Spots
You must verify the height clearance to ensure there is enough space between the bearer and the ground. Also, you might need to excavate some soil. Next, mark areas to outline where you will place the stumps. Referring to the timber-stand tables is vital to ensuring the stumps and bearer’s positions.
Step 2: Dig Holes
After marking the stumps’ designated spots, it is dug below the frost line. Ensure the hole’s depth extends at least 10 cm into the soil. The general rule of thumb is to dig holes that measure approximately 30 x 30 x 60 cm deep. However, your location determines the ideal depth. It is wise to apply a coat of bitumen to the stumps before placing them into the holes to prevent rotting.
Step 3: Mix Concrete and Place Stumps into the Holes
You will need to pour concrete into each hole and ensure it is halfway filled. Next, place the stumps into the holes, ensuring they align with the string. Use a level to check if the stumps are straight. Replace the soil in every hole and leave it to set for at least 10 hours. Mark off and cut the stumps to the required height once the concrete dries out.
How to Install Bearers
First, mark the stumps at the bottom and cut them off. To determine where to cut, subtract the joist spacing, bearers, and decking height from the deck’s overall size. Using a combination square to mark the stump is advisable, as it guarantees a straight-line cutting.
Use a tape measure to determine how far the house is from the string line. When installing large decks, you should use a nail gun to join the deck materials, as it offers sufficient strength. Remember to nail the bearer’s sides.
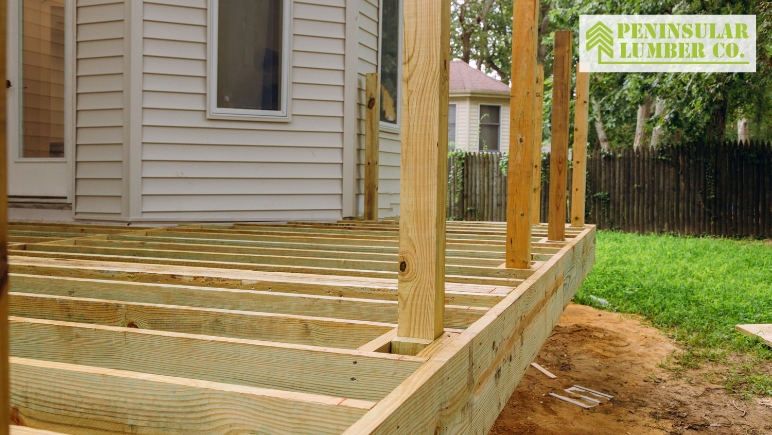
How to Install Joists
Divide the deck into even sections to achieve proper joist spacing. After marking out the joists, use a nail gun or hammer to attach them to the bearers. It is advisable to use galvanized nails to prevent corrosion and rust. Also, it is essential to use joist hangers, brackets, screws, and rim joists to offer additional strength to the joist framework.
How to Lay Decking
Measure and mark at least 475 mm intervals from your house to ensure the accurate spacing and perfect deck framing. You should also measure the length from your home to the frame edge, ensuring a 20 mm overhang. Next, cut and lay the intermediate boards to size.
Pre-drill and screw in boards, leaving the overhanging edges to be cut with a saw. Use a straight edge to guide the saw, or smoothen them later with sandpaper for even edges. You can attach a ledger board on one side of the deck to establish a strong connection with your house’s structures.
You should consider adding a step to the side of the deck if there is a big space between the door and the deck.
In summary, you should follow the steps above if you want to know how to build a wooden deck. With careful planning, preparation, and attention to detail, you can create a stunning deck with lumber and add value and functionality to your house.
When to Consider Experts
While a do-it-yourself wood decking project saves cost, it may raise other problems. Thus, if you want to build a phenomenal or multi-level wooden deck with lumber, it may be best to engage an experienced lumber company in Tampa.
At Peninsular Lumber, our team has assisted residents and custom home builders for over 75 years. If you need decking solutions and supplies, visit our lumber store today!